When you’re looking for a way to fix the Getting Windows Ready stuck error on Windows 10, you may have tried disconnecting from the internet. But this method does not work. In such cases, you’ll have to force restart your computer and try again. In addition, repairing your Windows 10 installation will not solve the problem. If you’re still unable to fix the problem, read on to learn how to solve this issue.
Fix Getting Windows Ready Stuck Error on Windows 10
The Getting Windows Ready error occurs when the Windows update is attempting to install a new update. It takes a long time to install the update as it needs to communicate with Microsoft servers and copy all the files you need to install it. However, there is a solution to this problem.
You can attempt to power cycle your computer to clear the memory of the computer and get it back to working. While this method may be temporary, it has the potential to cause permanent damage to your data.
Below are some methods which can help you fix the Getting Windows Ready error on your Windows 10 PC.
Perform a System Restore
If the problem persists, you may need to perform a system restore. First, you must be able to access a System Restore point or System Image Backup. Then, download and use the Microsoft Media Creation Tool.
The tool will create a bootable CD/DVD disc, USB installation drive, or Windows installation media. Once the process completes, your computer will be ready to run the new OS. The next step is to wait for the process to complete. You may need to wait as long as 2 hours.
The process to perform a system restore is easy: simply click the “Create new restore point” button in the System Protection tab, and then select a descriptive name for your system. You will also be asked to provide a date and time when the restored point was created. Once you have entered all of this information, click the “Next” button to continue. A window will pop up that asks you to confirm the restore point. Once you have done so, click “Yes” to continue.
Uninstall Recently Installed Windows Updates
To uninstall Windows updates, first select the Microsoft Windows option in the Control Panel. Look for the most recent install date of the update and make a note of the full name and Knowledge Base (KB) number. If you can’t remember either of those, you can search for the updates using the top-right corner search bar. Click the Uninstall button next to the problematic update. Your computer may need to reboot after the process.
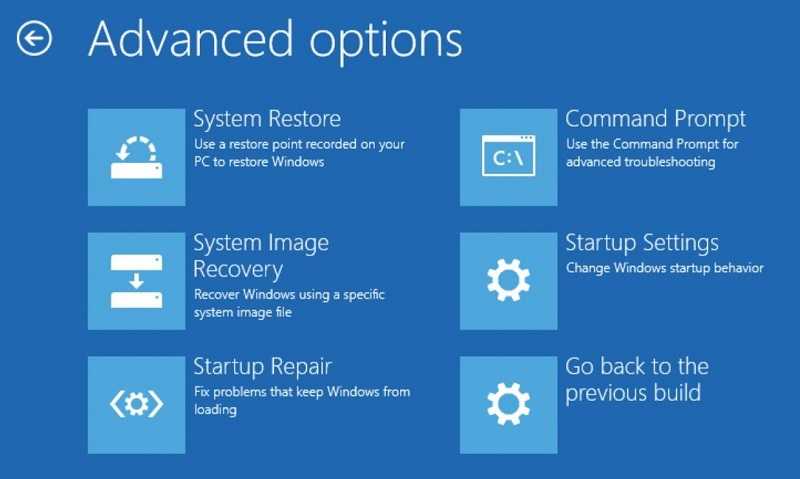
Windows 10 Startup Repair
The Windows 10 Startup Repair utility is designed to fix a number of common computer problems. This application is useful for repairing your PC if you are having trouble booting up the operating system. In order to use this tool, you should have access to a working Windows installation disc or media.
If you have an incompatible CD or media, you can install the Windows operating system from the disc/media. You will be prompted to reboot the computer, so you should make sure you do this carefully.
Reset Your Computer
A computer reset is the first step to restoring the original state of your gadget. Over time, software and settings files accumulate, and the hard drive becomes full of superfluous files. When you reset your device, most of the unwanted programs and malware are removed.
The resetting process allows your computer to start from scratch, loading only the essential files and apps. Once you have completed this process, you can begin a fresh installation of the system.
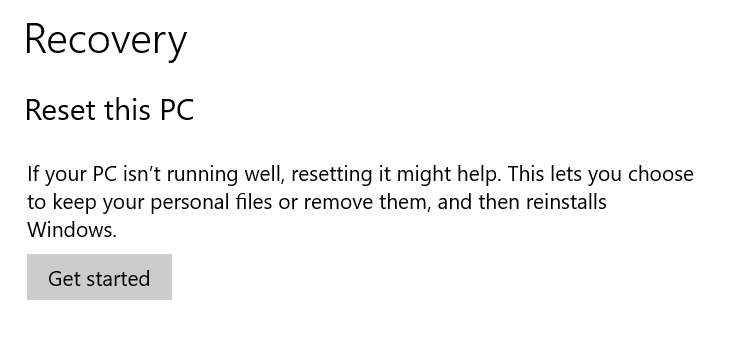
To reset your PC:
- Go to the Windows search bar and type ”reset this PC”
- Now under the recovery tab, you will find the option to reset your PC
- Simply click on Get Started under Reset this PC section.